Laura the Gastronaut > Recipes > Halloween >
Halloween Pumpkin Hand PiesHalloween Pumpkin Hand Pies
October 29, 2020 | Updated August 23, 2022 | Laura
*This post may contain affiliate sales links. Please see full disclosure policy for details.
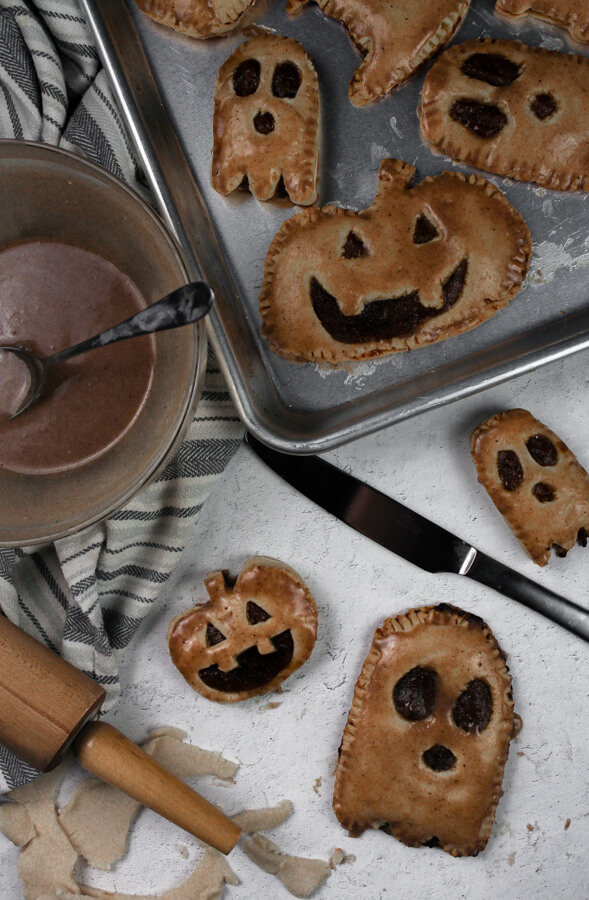
These adorable pumpkin hand pies are a perfect Halloween treat! The pie crust is hand-carved into spooky Halloween shapes and stuffed with a delicious homemade pumpkin pie filling. They are then covered in my super yummy browned butter cinnamon glaze. Yum! These hand pies are perfect for Halloween and all fall festivities!
Sweet, Pumpkin-y, and Cute
Happy last day of my four days of 2020 Halloween recipes! For the last recipe, I decided to go with something fun and cute (especially after posting those creepy roaches!).
These pumpkin hand pies are adorable and hand-cut (or you can use cookie cutters if you want). They are not perfect but what I like to call rustic. They are, however, the perfect way to really get creative and show everybody what you got! Of course, you could use cookie cutters as well if you're not feeling up to the challenge of cutting them out by hand.
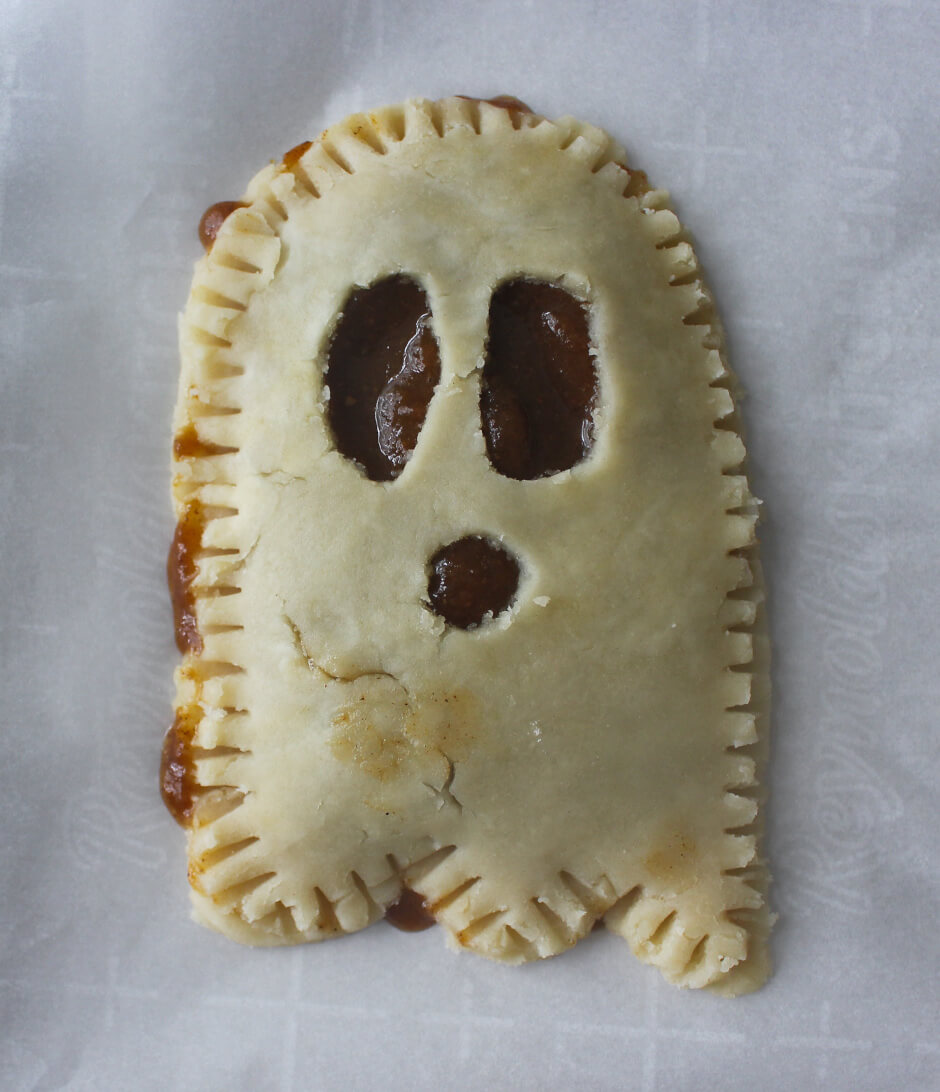
I made a few different designs, but the ghost was my favorite! Once the pumpkin hand pies are baked, I top them with my delicious browned butter cinnamon glaze. These taste just like fall!
Halloween Pumpkin Hand Pies: Ingredients
*Some of these ingredient links may be affiliate links. As an Amazon Associate I earn from qualifying purchases.*
✽ Pie Crust: You can use either store-bought pie crust or make it from scratch.
✽ Pumpkin Puree: Either homemade puree or store-bought will work for this recipe. Make sure you are using 100% pure pumpkin and not pumpkin pie filling.
✽ Vanilla Extract & Salt: Both will add in great flavor.
✽ Egg: The egg will act as a thickener and make the filling more solid so it doesn't ooze out of the hand pies.
✽ Brown Sugar: Will sweeten the hand pie filling and add a little molasses flavor. You can use either dark or light brown sugar.
✽ Spices: Cinnamon, Ginger, Nutmeg, Cloves, Allspice. This combination of spices will ensure that these hand pies taste just like fall!
✽ Corn Starch: Adding cornstarch will make the filling firm helping to hold it all in.
✽ Browned Butter Glaze: Butter, Powdered Sugar, Cinnamon, Nutmeg, Vanilla Extract, & Milk. The glaze may be my favorite part about these hand pies. It's so so good. Definitely do not skip the glaze!
How to Make Halloween Hand Pies
➊ The first thing to do to make these hand pies is get your hands on some pie crust. You can use store-bought, but I highly recommend making your own. It's actually pretty simple! I follow this recipe from The Pioneer Woman.
That recipe makes 3 pie crusts. You'll only need 1 or 2 for my pumpkin hand pie recipe, but the great thing about pie crusts is that they can be frozen and kept for later. This will make getting those Thanksgiving pies baked a breeze!
Preheat oven to 400°F. Working with the cold pie dough, roll it out as thin as possible with a rolling pin. I like to get the dough thin in order to get a good filling-to-crust ratio. Fold the pie dough in half so that there are two layers.
Using a sharp knife, carefully cut out spooky Halloween shapes of your choice. You can also use a cookie cutter instead as well. You will want to make the shapes fairly large so that it can hold a decent amount of filling. Try to make the hand pies about the size of the palm of your hand.
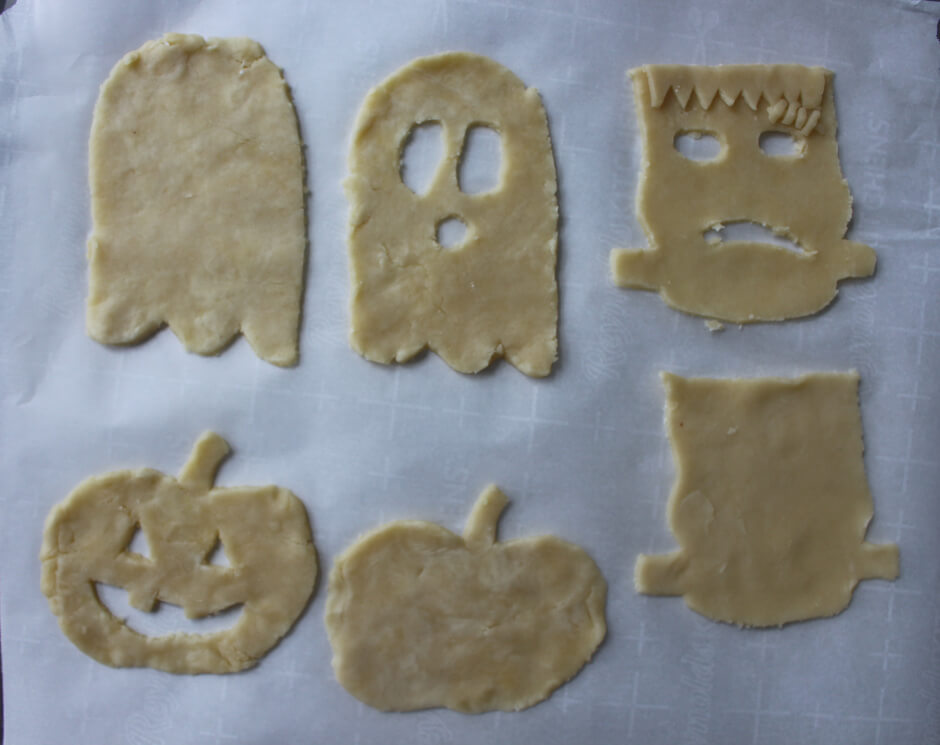
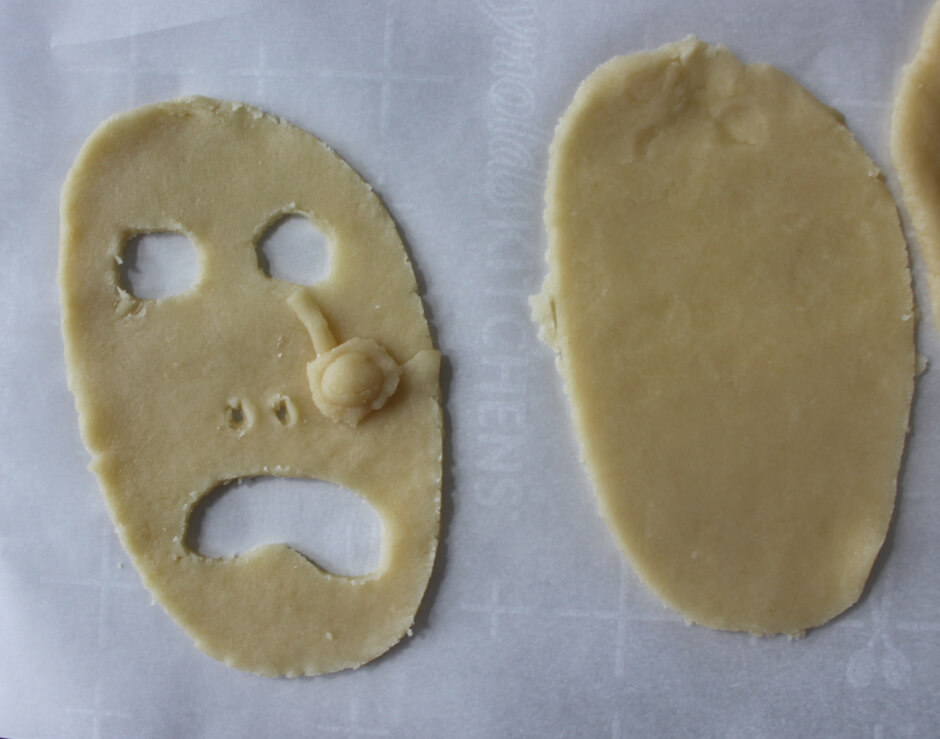
After cutting, separate the two layers, and cut out the spooky eyes and mouths into only one of the layers. You can also cut out other shapes from the leftover scrap dough for more detail. I made a hanging eye for the zombie and a scar and hair for Frankenstein. Check out the shapes I made below! I made a couple of ghosts, a zombie, Frankenstein, and a pumpkin.
You can also take the simple route and just make half circles as well for the hand pies.
➋ To make the pumpkin pie filling, whisk together 1/2 cup pumpkin puree, 1/2 teaspoon vanilla extract, 1 egg, 3 tablespoons brown sugar, 1 teaspoon cornstarch, 3/4 teaspoon cinnamon, 1/2 teaspoon salt, 1/2 teaspoon nutmeg, 1/4 teaspoon ground ginger, 1/4 teaspoon ground cloves, and 1/4 teaspoon ground allspice until well combined.
➌ Now scoop some of that delicious pumpkin pie filling onto the bottom layer of the cut pie crusts. You don't want to over-fill but make sure that you are getting as much as you can in there.
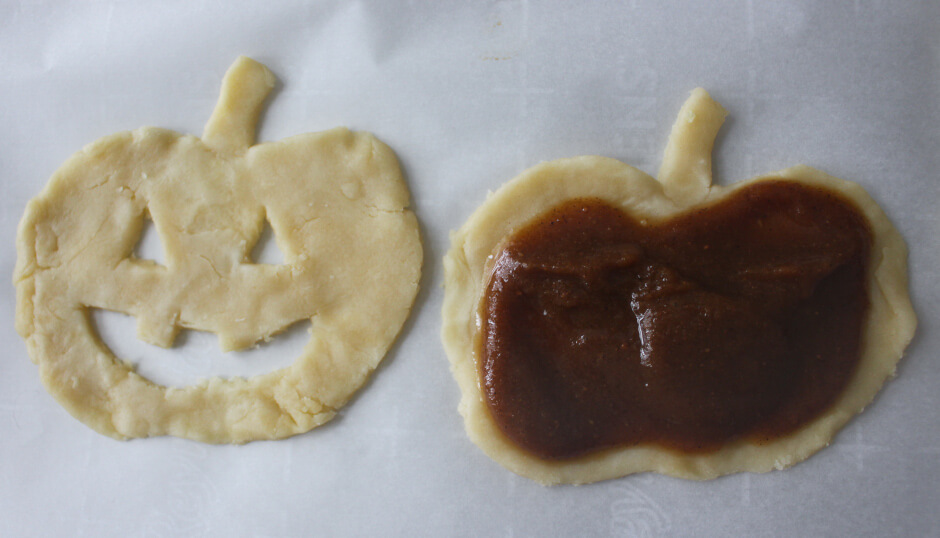
➍ Now it's time to put the top layer of the dough to cover the filling on the bottom layer. Press the two layers of dough together by using a fork along the edges.
➎ The hand pies are now ready to bake! Place hand pies on a parchment paper-lined baking sheet, and bake in preheated oven for 20-25 minutes until they become lightly browned. When done, remove from oven and let rest on the baking sheet for 5-10 minutes.
➏ While the hand pies are baking, make the glaze. In a small saucepan, melt 2 tablespoons of butter over medium heat, stirring constantly, until the butter has browned, about 5-10 minutes.
You'll know when the butter is done when the milk proteins in the butter begin to turn a light brown color. About the time it begins to change color, the butter should begin to smell nutty. Use the smell and the color to determine when the butter is done. Remove from heat immediately and pour into a medium bowl to stop the cooking.
To the bowl with the browned butter, add in 3/4 cups sifted powdered sugar, 1/2 teaspoon vanilla extract, 1/2 teaspoon cinnamon, 1/4 teaspoon nutmeg, and 2 tablespoons of milk. Whisk until it all comes together.
You want the glaze to be slightly runny so it slowly drips down the hand pies. If needed, add in more milk, by the teaspoon, to reach desired consistency.
➐ Now time to glaze the pies! Once the hand pies have cooled and you are able to pick them up, top them with the browned butter glaze. I like to spoon the glaze on top of the hand pies with a spoon. This helps prevent the glaze from going on top of the mouth and eye holes. If the glaze gets in there, the eyes and mouth will not be as noticeable.
What to Serve with Halloween Pumpkin Hand Pies
✽ Homemade Apple Cider; For my 31 Days of Halloween, we ate these pumpkin hand pies and sipped on these delicious homemade apple cider with a little bit of spiced rum. It was a perfect fall night staying in and watching Halloweentown.
31 Days of Halloween
This Halloween dessert recipe is a part of my 31 Days of Halloween. For each day in October, I come up with a cocktail recipe and snack recipe that perfectly matches a scary movie, Halloween movie, or a fun spooky activity. Check out 31 Days of Halloween for all of your Halloween snack and drinking desires!
Looking for more Halloween ideas?
→ Check out all of my favorite Halloween recipes!

Halloween Pumpkin Hand Pies
By Laura | Laura the Gastronaut
Prep Time: 25 minutes | Cook Time: 20 minutes | Total Time: 45 minutes
Yield: 7-8 hand pies
__________________________________
These adorable pumpkin hand pies are a perfect Halloween treat! The pie crust is hand-carved into spooky Halloween shapes and stuffed with a delicious homemade pumpkin pie filling. They are then covered in my super yummy browned butter cinnamon glaze. Yum! These hand pies are perfect for Halloween and all fall festivities!
*Some of these ingredient links may be affiliate links. As an Amazon Associate I earn from qualifying purchases.*
Please read through the entire recipe, how-to above, and notes below prior to cooking for best results.
Ingredients
• 1-2 pie crusts, preferably homemade (I like to use this recipe from The Pioneer Woman- Perfect Pie Crust Recipe) or store-bought [how much pie dough you need depends on how big you make your hand pies]
For the Pumpkin Pie Filling:
• 1/2 cup (113 grams) pumpkin puree, canned or fresh
• 1 egg
• 1/2 teaspoon vanilla extract
• 3 tablespoons brown sugar, light or dark
• 1 teaspoon cornstarch
• 3/4 teaspoon ground cinnamon
• 1/2 teaspoon salt
• 1/2 teaspoon ground nutmeg
• 1/4 teaspoon ground ginger
• 1/4 teaspoon ground cloves
• 1/4 teaspoon ground allspice
For the Glaze:
• 2 tablespoons (28 grams) butter
• 3/4 cups (90 grams) powdered sugar, sifted
• 1/2 teaspoon ground cinnamon
• 1/4 teaspoon nutmeg
• 1/2 teaspoon vanilla extract
• 2-3 tablespoons (30-45 mL) milk
Instructions
➊ Preheat oven to 400°F.
➋ Roll out the dough: Roll out the pie dough as thin as possible. Fold the dough in half so that there are two layers. Hand-cut out shapes of your choosing or use cookie cutters. You want the shapes to be fairly large so they can hold more filling. After cutting, separate the two layers and cut out the holes for the mouths/eyes/etc into only the top layer. See above for the shapes that I made and more detailed instruction.
➌ Make the Pumpkin Filling: Whisk together all the ingredients for the filling until well combined.
➍ Assemble the Hand Pies: Scoop some pumpkin pie filling onto the bottom layer of cut out pieces of dough. Place the top layer over the filling, and close them by pressing a fork along the edges.
➎ Bake Hand Pies: Place the hand pies on a parchment paper-lined baking sheet, and bake for 20-25 minutes until they are lightly browned. After baking, let rest on the baking sheet for 5-10 minutes.
➏ Make the Glaze: While the hand pies bake, make the glaze. Using a small saucepan, melt butter and stir constantly over medium heat for 5-10 minutes until the butter has browned (*see notes below for tips). Pour into a bowl, and add in sifted powdered sugar, cinnamon, nutmeg, vanilla extract, and whole milk. Whisk until it all comes together. You want the glaze to be a little bit runny so it slightly drips off of the hand pie.
➐ Glaze the Hand Pies: After the hand pies have cooled, top them with the glaze. I like to carefully put the glaze on with a spoon so none of it falls into the eye/mouth holes. It's okay if it gets in there, but your eyes will not be as noticeable if they are covered with glaze.
Notes
✽ Extra Glaze: I always have a little extra glaze leftover with this recipe. I like to keep a bowl of it to dip the hand pies in to get more of it. The more glaze, the better!
✽ Sizing: I like to make my hand pies about the size of my palm so a good amount of filling can be added without oozing out during the baking process. I can get about 7-8 hand pies from using one of The Pioneer Woman's pie crust recipe linked above.
✽ Browned Butter: Browning butter can be tricky if you do not know what to look for. Using a light colored saucepan can help so you can see the butter changing color easier. On medium heat and stirring constantly, watch the butter closely. You will begin to see the milk proteins in the butter start turning a light brown. A few seconds after this happens, you will begin to smell a nutty aroma. That smell means the butter has successfully browned. Remove from heat and pour into a bowl to stop the cooking.
✽ Sifted Powdered Sugar: The powdered sugar is sifted in order to prevent any lumps in the glaze.
__________________________________
✽ Did you make this recipe?
Let me know by leaving a comment below and sharing on Instagram. Tag @laurathegastronaut and hashtag it #laurathegastronaut.
Category: Fall, Halloween, Sweets Cuisine: American
Keywords: halloween pumpkin pie recipe, pumpkin hand pies, halloween pocket pies, halloween hand pies, pumpkin hand pie recipe, ghost hand pies
More Halloween Recipes:
✽ Spooky Spider Pizza Rolls (filled delicious pizza toppings, pricked with green bell pepper legs, and topped with olives for eyes; they make for a very fun Halloween treat for kids and adults)
✽ Beetlejuice Breadstick Hand with Meatball Eyes (these hands are tasty and creepy; a must-have for all Beetlejuice lovers)
✽ Halloween Roaches- Goat Cheese & Prosciutto Dates (these roaches are so realistic that they are sure to give your guests a fright and a treat)
→ Check out all of my Halloween recipes!
Bon appétit!
October 29, 2020 by Laura Ehlers
*This Halloween Pumpkin Hand Pies blog post and recipe may contain some Amazon affiliate links. These link to products that I personally use and recommend. If you purchase anything using my links, it will not cost you anything. It will though give laurathegastronaut.com some financial support which helps me keep this blog running. Thank you for reading my blogs and your continued support.

